DIY Wedding Confetti Cones From Paper
Roll paper confetti cones from 6 in squares, fill them with dried petals, lavender or punched paper, and make a simple box-lid stand to hand them out.

Project at a glance
Materials
- Text-weight paper or light cardstock (about 65 lb)
- Paper trimmer or scissors
- Double-sided tape or white glue
- Narrow ribbon or small tags (optional)
- 6 in paper doilies (optional)
- Dried petals, dried lavender or punched paper
- Sturdy lidded box, about 4 in deep
A paper cone solves two small problems at once. It gives every guest a neat handful of petals at exactly the right moment, and it keeps those petals from being crushed in pockets and bags beforehand.
These diy confetti cones are rolled from a plain paper square with no pattern to draw. One cone takes a couple of minutes, the method batches well, and the empty cones can be finished long before you fill them.
Ask the Venue Before You Choose a Filling
Check with the venue before making anything. Some allow nothing to be thrown at all, and many permit only natural petals, outdoors, in a particular spot. Paper confetti is often refused because it is slow to clear up. Get the answer first, then pick a filling that fits it.
If throwing is not allowed, ribbon wands for a send-off leave nothing behind on the ground.
Materials
- Text-weight paper or light cardstock (about 65 lb), cut into 6 x 6 in (15 x 15 cm) squares
- Paper trimmer or scissors, a ruler and a pencil
- Double-sided tape, or white glue and a few paper clips
- Optional: 6 in paper doilies, narrow ribbon, small tags
- Filling: dried petals, dried lavender or punched paper
- A sturdy box with a lid, about 4 in (10 cm) deep, for the stand
Text-weight paper rolls into the smoothest cone. Light cardstock is sturdier but resists curling; draw it once over the edge of a table to relax it first. For cutting many identical squares quickly, see the guide to cutting cardstock accurately.
Roll One Cone Step by Step
- Lay a square in front of you as a diamond, with one corner pointing toward you. That corner becomes the tip of the cone.
- Stick a strip of double-sided tape along the lower right edge, from the tip to the right-hand corner.
- Lift the left corner and curl it over toward the middle, keeping the bottom corner tight so it forms a closed point.
- Keep rolling toward the right corner until the taped edge wraps around and overlaps the outside of the cone.
- Adjust the opening to about 2 in (5 cm) across, check that the tip has no gap, then press the taped seam down firmly.
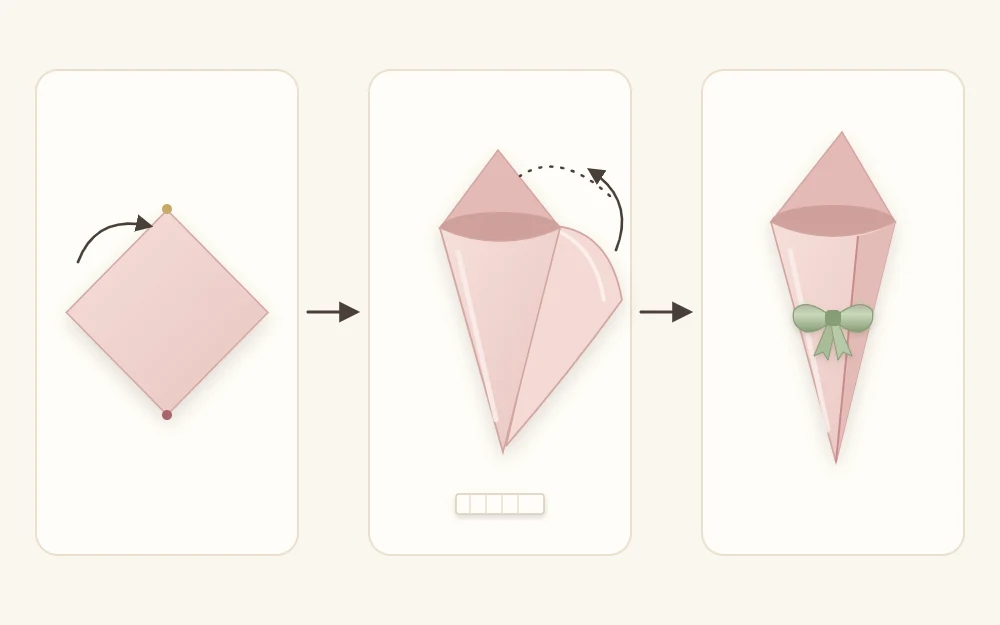
The far corner of the diamond now stands up as a tall point at the back of the cone, which makes a natural handle. If you use white glue instead of tape, run a thin line along the same edge and hold the seam with a paper clip at the rim for about ten minutes.
Tip
A small hole at the tip leaks lavender buds and tiny confetti. Fold the last 1/4 in (6 mm) of the tip up and secure it with a sliver of tape, or line the cone with a doily.
Line, Trim and Decorate
- Doily lining. Lay a 6 in paper doily on the square before rolling so its lace edge shows above the paper at the opening.
- Level top. For a simple cup shape, cut straight across the back point with scissors, level with the front of the rim.
- Ribbon. Tape a 10 in (25 cm) length of narrow ribbon around the cone about 1 in (2.5 cm) below the rim, covering the top of the seam, and tie it in a small knot or bow.
- Tag. Punch a hole in the back point and tie on a small tag with your own short wording.
What to Put Inside
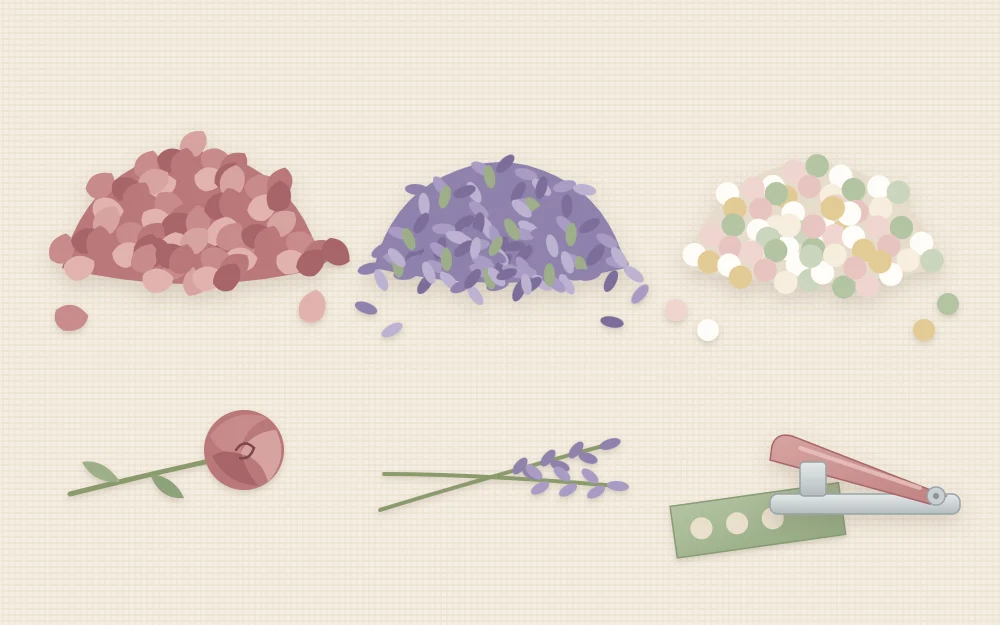
All three fillings below are dry and light. Roughly one small handful fills a cone to just below the rim.
- Dried petals. Rose and other flower petals sold dried for this purpose are the most widely accepted. They are fragile, so handle them gently.
- Dried lavender. Scented and fine. It is harder to see in the air, so mix it with petals for color.
- Punched confetti. Punch circles from text-weight paper or tissue with an ordinary hole punch. The same punch turns dry fallen leaves into leaf confetti, a good choice where only natural material may be thrown.
To work out how much filling to get, fill one finished cone, tip its contents into a measuring cup and multiply by your number of cones. Add a little extra, since petals settle and some will break.
Make a Stand From a Box Lid
Cones cannot stand on their own, so they need a holder that shows them off and lets guests take one easily.
- Choose a sturdy lidded box at least 4 in deep. A lid of roughly 9 x 12 in (23 x 30 cm) holds 12 cones in three rows of four.
- On the lid, mark the hole centers 2 1/2 in (6.5 cm) apart in both directions, starting about 2 in from the edges.
- Draw a circle about 1 1/4 in (3 cm) across at each mark, tracing around a bottle cap or large coin.
- Push a sharpened pencil through the center of each circle, then enlarge the hole with small pointed scissors, snipping out to the line.
Each cone drops into a hole and rests at an angle. No time for a stand? Lay the cones in a shallow basket or tray lined with fabric, tips all pointing the same way.
How Many Squares, and Resizing
Decide how many cones you want, then add about 10 percent for spares. A letter-size sheet gives only one 6 in square, with offcuts you can punch into confetti or cut into tags. A 12 x 12 in (30.5 x 30.5 cm) sheet gives four.
To use letter-size paper more efficiently, cut 5 1/2 in (14 cm) squares instead: each sheet gives two, and the cone is only slightly smaller. So 60 cones need 60 sheets at the full size, or 30 at the smaller one. For a larger cone to hold a favor, use an 8 in (20 cm) square, perhaps alongside small favor boxes made from cardstock.
When to Make and When to Fill
Empty cones keep for weeks or months. Nest them loosely in stacks of five or six, lay the stacks in a box and store it somewhere dry and out of sunlight.
Fill the cones on the day or the day before. Dried petals lose color and crumble the longer they sit in the open, and damp air softens the paper.
Frequently asked questions
What size paper do I need for a confetti cone?
A 6 inch square makes a cone with an opening of about 2 inches that holds a small handful of petals. A 5 1/2 inch square is nearly the same and gives two cones per letter-size sheet. Text-weight paper or light cardstock rolls best; heavy cardstock is too stiff.
What can I fill confetti cones with?
Dried flower petals are the most common filling, with dried lavender or hole-punched paper or leaf confetti as alternatives. Whatever you choose, ask the venue first what may be thrown and where, since many places accept only natural petals outdoors and some do not allow anything.
How far ahead can I make and fill confetti cones?
The empty paper cones can be rolled weeks or even a couple of months ahead and stored loosely nested in a dry box. Fill them on the day or the day before, because dried petals fade and crumble when left out and paper softens in damp air.