DIY Wedding Favor Boxes: A Pillow Box and a Small Cube
Draw, score and fold two favor boxes from plain cardstock: a 3 x 5 in pillow box and a 2 in cube with a tuck-in lid. With measurements, sheet counts and a batch workflow.
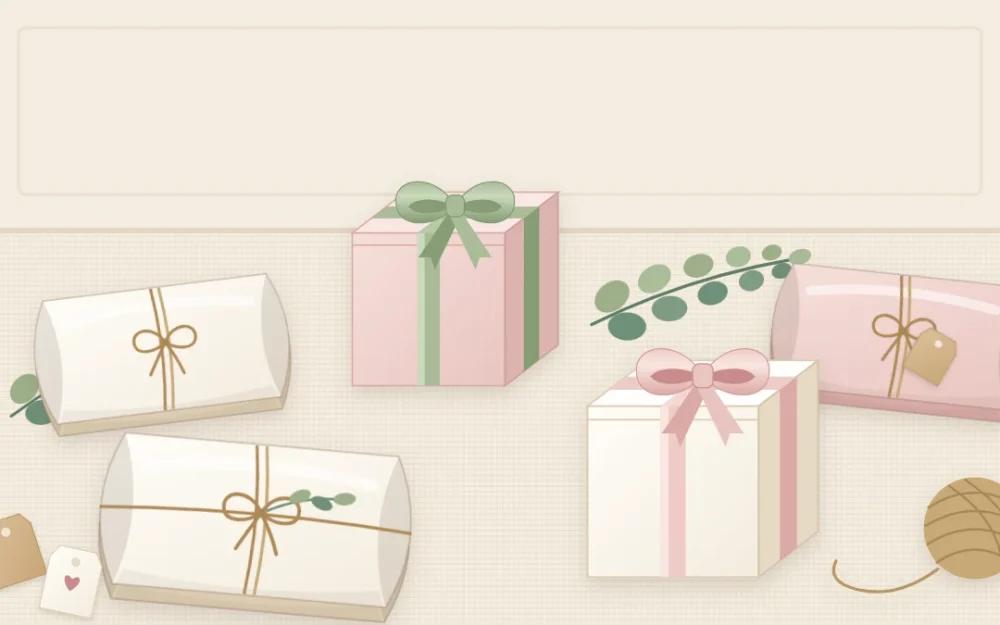
Project at a glance
Materials
- Cardstock, about 65 to 80 lb, letter size
- Ruler, pencil and eraser
- Saucer or jar lid about 5 in across
- Scissors or a paper trimmer
- Bone folder
- Double-sided tape or white glue
- Twine or narrow ribbon, about 18 in per box
You do not need a kit or a cutting machine to make a neat favor box. Both designs here are drawn straight onto cardstock with a ruler, a pencil and one round object from the kitchen, so your diy wedding favor boxes can be any color or size you like.
The pillow box is the quicker of the two; the small cube takes a few more folds. Make one of each from scrap paper before you cut good cardstock.
What You Need
- Cardstock of about 65 to 80 lb, in letter-size sheets (8 1/2 x 11 in)
- Ruler, sharp pencil and eraser
- A saucer, jar lid or roll of tape about 5 in (13 cm) across
- Scissors or a paper trimmer
- Bone folder, or an empty ballpoint pen, for scoring
- Double-sided tape about 1/4 in (6 mm) wide, or white glue
- Thin card for a master pattern
- Twine or narrow ribbon for closing
Lighter cardstock suits the curved pillow box; heavier gives the cube crisper walls. Every fold must be scored first; if that is new to you, see the guide to scoring cardstock for clean folds.
The Pillow Box
Draw the pattern
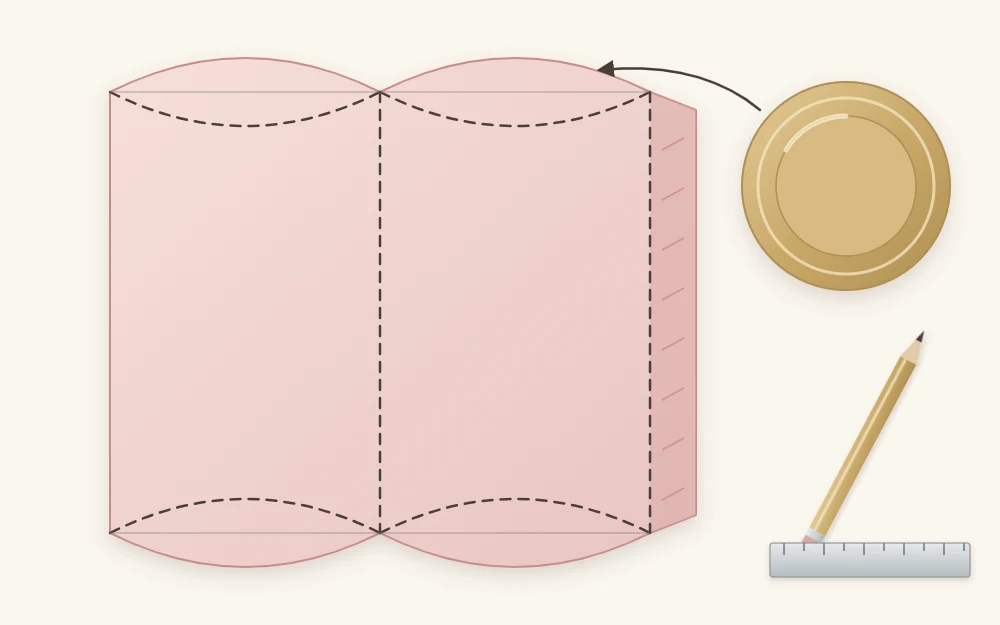
- Draw a rectangle 6 1/2 in wide and 5 in tall (16.5 x 13 cm).
- Measuring from the left edge, rule two vertical lines at 3 in (7.5 cm) and 6 in (15 cm). You now have two 3 in panels and a 1/2 in (1.3 cm) glue flap.
- On the top edge of the first panel, mark the midpoint and make a second mark 1/2 in below it. Lay the saucer so its rim passes through the two top corners of the panel and that lower mark, and draw the arc.
- Repeat on the top of the second panel and on the bottom of both panels. You should have four arcs, all bowing in toward the middle of the box.
- Trim both ends of the glue flap at a slant so they clear the arcs.
Score, glue and close
- Cut out the rectangle. Score the two straight lines against the ruler.
- Score the four arcs by running the bone folder slowly along the rim of the saucer.
- Fold on the straight lines and crease firmly.
- Stick double-sided tape to the flap, fold the box flat and press the flap to the inside edge of the first panel.
- Squeeze the long sides so the tube opens, then press in one curved end, front arc first. Fill the box and close the other end.
The 2 Inch Cube Box
Draw the net
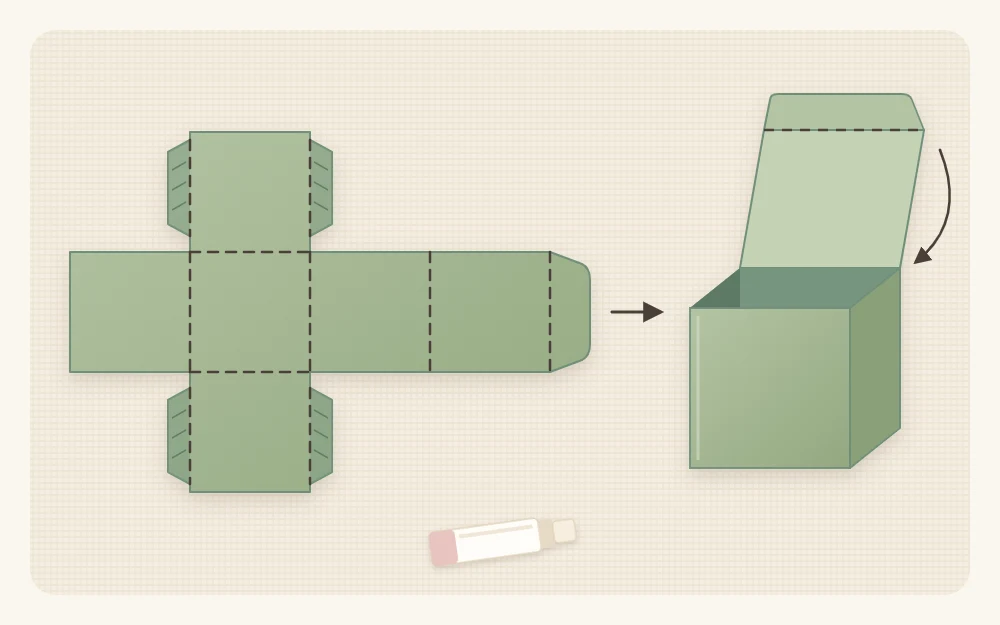
- Draw a column 2 in (5 cm) wide and 8 in (20 cm) long, and rule across it every 2 in to make four squares. From one end, call them front, base, back and lid.
- Draw one more 2 in square on each side of the base square. These are the side walls, and the net now looks like a cross.
- Add a 1/2 in tab to the two edges of each side wall that point toward the front and the back, leaving the outer edge plain. That makes four glue tabs.
- Add a 1/2 in tuck flap to the free end of the lid.
- Clip the corners of every tab and of the tuck flap at a slant.
The finished net measures 8 1/2 x 6 in (21.5 x 15 cm), so it uses the full width of a letter-size sheet.
Score and assemble
- Cut around the outline. Score every line between two squares and every line where a tab or the tuck flap joins a square.
- Fold all the scores the same way, toward the pencil side, so the marks end up inside the box.
- Put tape or a thin line of glue on the outer face of the four tabs.
- Lift the front and one side wall, and press the tab to the inside of the front. Repeat for the other three tabs, keeping the top edges level.
- Fold the lid over and slip the tuck flap inside the front wall.
Tip
If the lid springs open, trim a sliver of about 1/16 in (1.5 mm) from each side of the lid and flap.
Tape or Glue for the Seams?
Double-sided tape is the faster choice: it grabs at once and adds no moisture. Press hard along the whole seam.
White glue bonds better on textured cardstock, but too much ripples the paper. Spread a thin line, hold the seam for about half a minute and let the box rest before filling it.
Close and Decorate
Wrap twine or narrow ribbon once around the box and tie a bow on top; about 18 in (46 cm) per box is enough. Thread a small tag onto the twine before tying: the tutorial for handmade favor tags has four shapes to choose from.
What Fits Inside
- Pillow box: the clear space is roughly 4 in (10 cm) long, 3 in wide and about 1 in (2.5 cm) deep at the center. It suits a few purchased, wrapped sweets, a seed packet or a folded note.
- Cube: a little under 2 in each way inside, enough for three or four wrapped chocolates or a small keepsake.
Test with the real contents before cutting a full batch. For soft or awkwardly shaped items, fabric or paper favor bags are more forgiving than a box.
How Much Cardstock to Buy
One letter-size sheet gives two pillow boxes, stacked along the 11 in side. A cube net takes one sheet, and the strip left over, 8 1/2 x 5 in, is exactly big enough for one pillow box.
Count one box per guest and add about ten percent. For 80 guests that is 88 boxes: 44 sheets for pillow boxes, or 88 sheets for cubes. Twine at 18 in each comes to 1,584 in, which is 44 yd (40 m).
Batch Workflow
- Make a master. Draw the pattern once on thin card and cut it out carefully. Snip a tiny notch at both ends of every score line.
- Trace. Draw around the master on each sheet and mark a pencil tick in every notch.
- Cut all. Cut every box before you score any.
- Score all. Join the ticks with the ruler for straight scores, and set the saucer against the ticks for curved ones.
- Assemble. Fold, tape and stack. Pillow boxes store flat with their ends open; cubes store flat before the tabs are glued.
Boxes can be made months ahead; keep them flat and dry.
Frequently asked questions
What weight of cardstock is best for favor boxes?
Something in the range of 65 to 80 lb works for both designs. The lighter end bends into the curved ends of a pillow box without cracking, while the heavier end gives a cube firmer walls. Very heavy cardstock is hard to score on a curve and tends to split along tight folds.
Why do the ends of my pillow box pop open?
Usually the curved scores are too faint or the cardstock is too stiff. Go over each arc again with firm pressure, then pre-fold all four curves with your thumbs before gluing the seam. Pressing the front arc in first and the back arc over it also helps the ends lock.
Can I make the boxes bigger?
Yes. For the pillow box, widen both panels by the same amount and lengthen the rectangle, keeping the curve depth near half an inch. For the cube, increase every square equally. A cube larger than about 2 1/2 inches no longer fits a letter-size sheet in one piece, so use larger paper.